KUMIKI
- Multiple Sculpted Prim Editor -
KUMIKI - Multiple Sculpted Prim Editor - Ver 1.45 by Yuzuru Jewell (KANAE PROJECT) produced by youwith 10/13/12
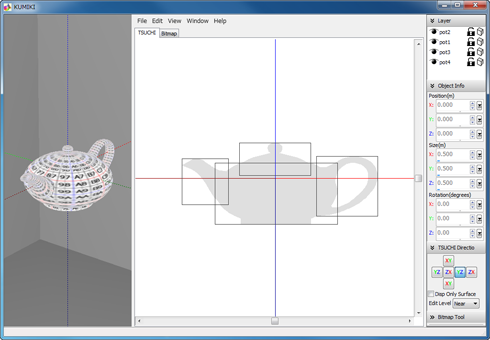
KUMIKI displays both: sculpted prims and their textures.
Multiple Sculpted Prims can be edited in the two modes: TSUCHI/Bitmap.
TSUCHI mode has two edit modes: object mode and mesh mode.
For more information on the different modes, see below.
KUMIKI 1.0.X users can use their password.
Download
KUMIKI 1.45 for win32 10/13/12
The trial period is for three days. During the trial period, you cannot export Sculpted Prim files.License
The Software is provided "AS IS," without a warranty of any kind.
In no case shall the author be liable for any damage or unwanted behavior of any computer hardware and/or software.
No Rental. Customer may not rent or lease the SOFTWARE to someone else.
All title and copyrights in and to the SOFTWARE (including but not limited to all images, photographs, animations, video, audio, music, text, and other information incorporated into the SOFTWARE), the accompanying printed materials, and any copies of the SOFTWARE, are owned by KANAE PROJECT.
The SOFTWARE is protected by copyright laws and international treaty provisions. Accordingly, Customer is required to treat the SOFTWARE like any other copyrighted material, except as otherwise allowed pursuant to this LICENSE and that it may make one copy of the SOFTWARE solely for backup or archive purposes.
Operating environment
Windows 7 64bit/32bit
Install & Uninstall
Install
There is no installer.
Uninstall
You can uninstall only by deleting the file called KUMIKI.exe.
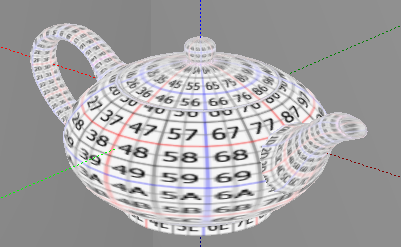
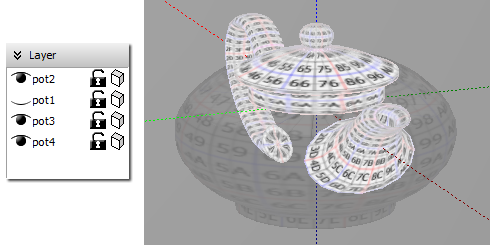
How to use Preview
You can drag an object and make it rotate. When you ctrl-click an object, you can change the target object. A red point is the control point chosen when you edit a prim by mesh mode. The gray lines are sections which are not chosen, and will not move or be adjusted.
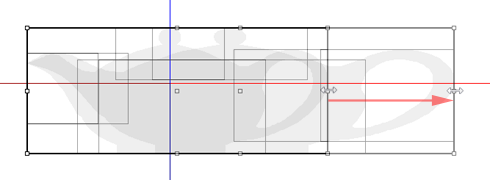
How to use Edit
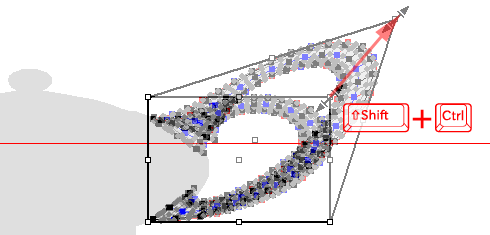
You can select a single control point or a range of points to move together.
The points can be dragged, rotated or moved together.
Holding down the CTRL key during this movement of the points causes the arrangement of the control points to be distorted.
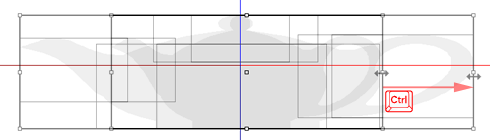
You can also lock the selected control point(s).
*The stretch of edit is restricted.
The Edit Panels in KUMIKI :
(On the right of the KUMIKI window)
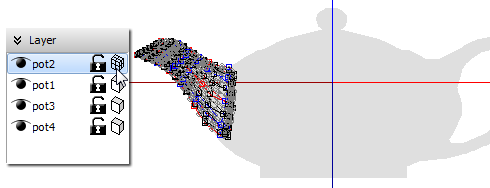
Layer
You can set property of the object.
You can change the visible option of the object.
You can change the edit mode of the object on TSUCHI mode.
Object mode: You can edit the position, size and rotation of the object. This feature is much like the editor used in Second Life.
Mesh mode: You can edit the control points of the object or sculpted prim like TSUCHI mode of TATARA.
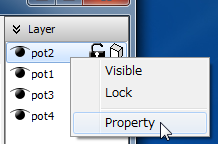
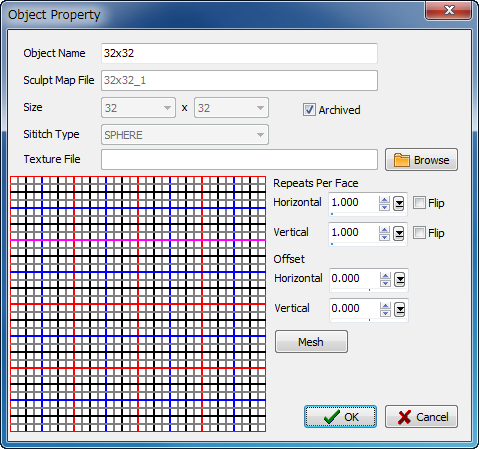
If you right-click the object on the Layer panel, you can edit the property of the object.
- Object Name:
- You can set the object name.
- Texture File:
- You can set the texture file and options of the object.
- Archived:
- When you save it as Collada, you can make 8 archived objects into one geometry. If you uncheck archived option, you can make this object as one prim.
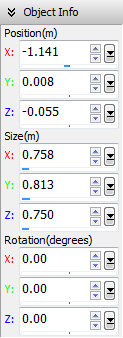
Object Info
You can set the position, size and rotation of the selected object, again, similar to the edit feature of Second Life.
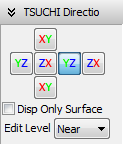
TSUCHI Direction
Here you can edit only the control points on the face displayed.
Edit Level - If you set it to Middle or Far, other control points will be rearranged from the control point displayed by Level of Detail. The method of rearrangement can be selected by Setup on File menu.
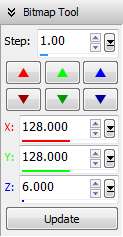
Bitmap Tool
You can edit the control points of the object as sculpted prim like BITMAP mode of TATARA.
You can adjust the control points in 1 or more pixel increments by changing the numeric value in the text box.
How to use the Menus:
File
- -Open Project
- You can open a KUMIKI XML file as a project.
You can open as a project Text File for TSUBO and sculpt map files saved by TATARA.
Text File for TSUBO does not include texture information now. - -Save Project
- You can save a project by Text File for TSUBO and sculpt map files, KUMIKI XML file and Collada file for Mesh of Secondlife.
Text File for TSUBO and sculpt map files can upload to Second Life.
You can save Collada file for Mesh of Secondlife. The same UV map as the sculpted prim is outputted. Only High of LOD is outputted. The collada file doesn't have options of the texture.
When you select it, you can select following option.
- Scale - You can set the scale of the object.
- Hard Angle - You can specify the hard angle of normal vector.
- The optimized vertices - The vertices are optimized. Almost the same UV map as the sculpted prim is outputted.
- -Clear Project
- You can clear the project.
- -Add Object
- You can add sculpted map files to your project.
- -Delete Object
- You can delete selected objects.
- -Setup
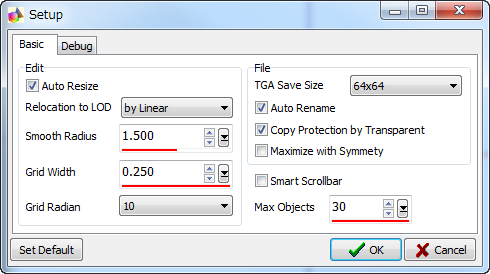
- --Auto Resize - When you edit an object in mesh mode, the size of an object is automatically adjusted as required.
- --Relocation to LOD - You can choose the way of rearranging control points according to Level of Detail. Edit Level uses this setting.
- ---by Linear - The control points are rearranged by linear.
- ---by Parent - The control points stick to the control point of the standard.
- --Smooth Radius - You can set up the level of Gauss smoothing.
- --Grid Width - The width of the grid when dragging the object or control points which you chose, pressing the Shift key is specified.
- --Grid Radian - The Radian of the grid when you rotate the object or control points which you chose, pressing the Shift key is specified.
- --TGA Save Size - You can set up the TGA size of file to save. 64x64 is the recommended size.
- --Auto Rename - When saving a file, you can change the name of a file automatically so that it may not be overwritten.
- --Copy Protection by transparent - When a Prim is modified, you can make it transparent to prevent the texture from being copied by screen capture.
- --Maximize with Symmetry - You can maximize your object with symmetry by Maximize on Edit menu.
- --Max Objects - You can specify the maximum count of the object which you can edit.
- -Exit
- The program is ended.
Edit
- -UNDO/REDO
- There is a 16-step UNDO and REDO function.
- -Copy
- The selected control points are memorized.
- -Paste
- The memorized control points are pasted on the basis of the control point selected on the Bitmap tab.
- -Horizontal Align
- Chosen control points are lined up on the horizontal axis.
- -Vertical Align
- Chosen control points are lined up on the vertical axis.
- -Equal Intervals
- The interval of three or more selected control points is evenly arranged.
- -Equal Distance
- The selected control point is rearranged at equal intervals on the line which connects them.
- -Flip Horizontal
- The left and right sides of Prim are reversed.
- -Flip Vertical
- The upper and lower sides of Prim are reversed.
- -Maximize
- Selected object is maximized on mesh mode.
- -Mirror Horizontal
- Creates HORIZONTAL symmetry by mirroring X0-GG to 00-XG, which is the horizontally symmetrical position. You can choose the symmetry plane. The caption is changed according to the aspect.
- -Mirror Vertical
- Creates VERTICAL symmetry by mirroring 0X-GG to 00-GX, which is the vertically symmetrical position. You can choose the symmetry plane. The caption is changed according to the aspect.
- -Offset
- You can make small adjustments to the position of your object.
- -Inside Out
- Selected object is made inside-out.
- -Lock/Unlock
- You can prevent selected control point(s) from being moved.
- -Select
- You can choose all the control points, or you can reverse your current selection.
- -Select All
- All the control points currently displayed are chosen. Control points which are not displayed in the current view cannot be chosen.
When you choose more than one control point, the following "Edit" functions are also available from a right-click popup menu. When you don't select any control points, the popup menu is not enabled. Using your mouse, draw a box around the points you want to control together, or select them individually while holding down the "Shift" button. - -Smooth
- You can smooth disorderly selected control points by three methods.
- --Gauss Smooth
- --Moving Average
- --Horizontal Moving Average
- --Vertical Moving Average
- -Magnet
- The selected control points are pulled and collected to a single point, which can be moved.
View
- -Reset Position
- The display position of Edit Pane is reset.
- -Reset Zoom
- Zoom of Edit Pain is reset.
Keyboard Operation
- -Move edit pane
- If you press space key and drag the mouse, view point of edit pane is moved.
- -Zoom edit pane
- If you press "+" or "-" key, edit pane is zoomed.
- -Move
- If you press an arrow key, the selected control point is moved 1 pixel.
If you press an arrow key and the Shift key simultaneously, it will move 8 pixels.
If you press the page up key and the page down key while using the TSUCHI tab, a control point will be moved in the depth direction.
*While you are displaying the Bitmap tab, and have the right click menu open, the events of the keyboard are sent to that menu instead.
History
- 10/07/12 1.45
- -The texture with Alpha can be used.
- -The maximum of the edit object were changed into 32.
- -The side panel was updated.
- -You can update the name of the object only in the property dialog.
- -The edit function of the object by the keyboard was updated.
- -The bug of rotation of the selected control point on mesh mode was fixed.
- -The information on the sculpted prim of the XML file is optimized.
- -Handling of the keyboard has been improved.
- -The control point selecting way on the Bitmap tab was changed into the same operation as TATARA.
- -The the library of displaying and saving TGA/PNG format were changed.
- -The bug of management of the texture of the history was fixed.
- -The bug of the edit function on the TUCHI tab was fixed.
- 05/12/12 1.34
- -The bug of memory management system was fixed.
- 12/06/11 1.33
- -The function to save Collada Physics shape file was added.
- -The function to save Lowest Lod file was added.
- -The rule of the file version was changed.
- 07/30/11 1.0.31
- -The option of "Save low/medium/high LoD" on Collada Option Dialog was added. You can save High/Medium/Low Level of Detail Collada files.
- -The bug of outputting KUMIKI XML was fixed.
- 03/25/11 1.0.30
- -The maximum size of the Collada object was changed into 64.
- -The fault of the authoring tool name of the Collada file was modified.
- -The file name was added to the node name of the Collada file.
- -Material management of the Collada file was changed.
- -The fault as which the option of the smart scroll bar is not displayed correctly was modified.
- -You can drop a TATARA XML file with Edit pane.
- 10/04/10 1.0.28
- -The "Add Dialog" was improved.
- -The "Save Project Dialog" was improved.
- -The function which outputs a Collada file was added.
- 09/11/10 1.0.26
- 08/12/10 1.0.22 beta
- 08/06/10 1.0.21 alpha
Trial & Buy
A trial period is for three days. During thetrial period, you cannot output Sculpted Prims.
When starting software, a dialog box asking for a serial code (license) is displayed.
After the trial period has passed, it becomes impossible to start.
Please purchase KUMIKI Serial Code (license) from the KUMIKI Serial Box in-world at:
http://maps.secondlife.com/secondlife/Phasic%20Foo/45/28/24
Credits
-GLScene http://glscene.sourceforge.net/wikka/HomePage
GLScene is released to the public as open-source under Mozilla Public License. http://www.mozilla.org/MPL/
-Graphics32 http://www.graphics32.org
Graphics32 is released to the public as open-source under Mozilla Public License. http://www.mozilla.org/MPL/
-BMDSpinEdit by Boian Mitov. http://www.mitov.com/
Thanks to KJ Georgette for help with the Readme file and this page.