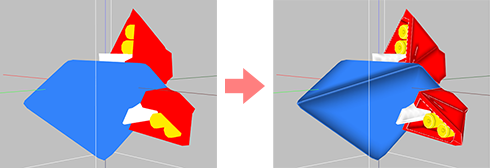
SOMATO projects a flat picture onto your 3D model(sculpted prim/Collada/.obj) and display it as the texture of your 3D model.

You can specify the strength of light, either Ambient or Diffuse. And it can add the sculptured prim's natural shadow to the texture.
For more information on the different modes, see below.
It is not guaranteed that a display of in SOMATO will be exactly the same as a display of Sculpted Prim in Second Life.
The SOMATO may not operate with the video card of ATI for the fault of a driver. Please check before purchase whether it operates.
SOMATO 4.X users can use their password.
SOMATO 3.X 2.X, 1.X users need to purchase an updated license of SOMATO 4.0 from the serial box in SL at: KANAE PROJECT Shop
The password for SOMATO is different from the password for TATARA and ROKURO Pro.
SOMATO 4.72 (11/03/14)
The trial period is for three days.
During the trial period, you cannot output textures.
Virus checked by NOD32 ver.10666.
The Software is provided "AS IS," without a warranty of any kind.
In no case shall the author be liable for any damage or unwanted behavior of any computer hardware and/or software.
No Rental. Customer may not rent or lease the SOFTWARE to someone else.
All title and copyrights in and to the SOFTWARE (including but not limited to all images, photographs, animations, video, audio, music, text, and other information incorporated into the SOFTWARE), the accompanying printed materials, and any copies of the SOFTWARE, are owned by KANAE PROJECT.
The SOFTWARE is protected by copyright laws and international treaty provisions. Accordingly, Customer is required to treat the SOFTWARE like any other copyrighted material, except as otherwise allowed pursuant to this LICENSE and that it may make one copy of the SOFTWARE solely for backup or archive purposes.
- SOMATO Frequently Asked Question(FAQ)
- Tutorial Blog: How to make sculpted prim by TATARA
- Tutorial Video: YouTube Yuzuru Jewell Channel
- SOMATO 3.0
- SOMATO 2.5
Windows 64bit
Windows 10 64bit / Windows 11
The environment where "Second Life" operates.
Windows 32bit
Windows 10 32/64bit / Windows 11
The environment where "Second Life" operates.
OSX 32bit
Lion/Mountain Lion/Marvericks
The environment where "Second Life" operates.
Install
There is no installer.
Uninstall
You can uninstall only by deleting the file called "SOMATO.exe".
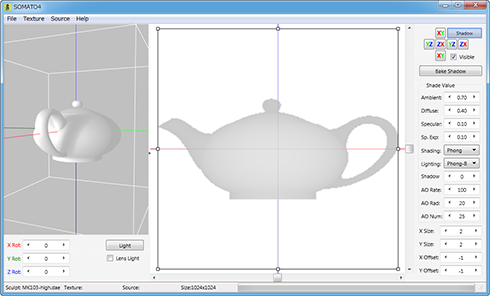
How to use the Preview pane (the left side of the screen)
You can click and drag your object with the mouse and make it rotate.
- X Rot/Y Rot/Z Rot
- You can rotate the object.
- Light Button
- You can change the light position.
- Lens Light Checkbox
- When you move the camera, the light moves to camera position.
How to use the Edit pane (the left side of the screen)
When you right-click the scroll bar, a popup menu is displayed.
- Reset Position
- The display position of the Edit Pane is reset.
- Reset Zoom
- The Zoom of Edit Pane is reset.
How to use Menus and Buttons
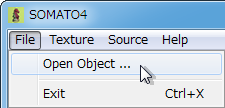
[ File ]
- Open Object
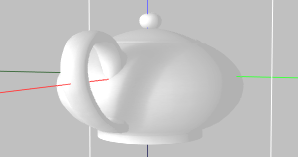
- The file for the Sculpted Prim, OBJ file, KANAE Collada File is loaded.
It is displayed in the preview pane with white texture.
SOMATO judges Stitching Type of a Sculpt Map automatically. When it is not being recognized correctly, please use NUIME. NUIME is freeware. - Exit
- SOMATO is ended.
[ Texture ]
You can create the texture of the multi-material. SOMATO can make multiple textures at once.
- Reset
- The texture of the Object is restored to its original condition.
- Load
- The texture of the Object File is loaded.
- Save
- The texture of the Object File is saved as a file.
* Your selection of a PSD file will save the created texture at each layer.
- Grid
- The grid is added to the texture of the object in the of a preview pane.
- Full Bright
- The preview of the object is shown in Full Bright.
- Bake
- The Source Texture of the selected direction is projected onto the object.
- Bake Shadow
- The shadow is created by applying light positon and viewpoint and is projected onto the texture.
- Size
- You can select the size of the texture from 512x512, 1024x1024, 2048x2048.
- Resolution
- You can select the resolution of the self-shadow from 512, 1024, 2048.
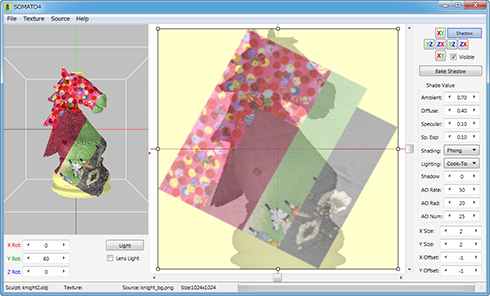
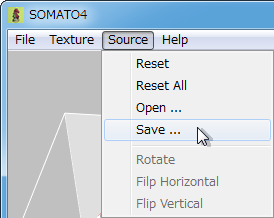
[ Source ]
SOMATO can load a source image in any of six directions. The arrangements are managed independently.
- Reset
- The displayed source image is reset.
- Reset All
- All source images are reset.
- Load
- The image is loaded as a source texture in the selected direction.
You can drag the control point arranged in the four corners of a source image, and can adjust the position. - Save
- The image of object is saved as a image file.
- Rotate
- Source texture rotates clockwise 90 degrees.
- Flip Horizontal
- Source texture is flipped horizontally.
- Flip Vertical
- Source texture is flipped vertically.
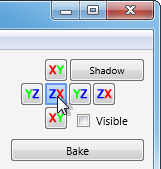
Buttons on the Edit pane
- XY/YZ/ZX Button
- You can choose the orientation on which Source texture is projected.
- Shadow Button
- Bake Shadow Button is displayed.
- Visible Check box
- The selected texture is displayed.
- Bake Button
- The Source Texture of the selected direction is projected onto the object.
- Bake Shadow Button
- The shadow is created by applying light position and viewpoint and is projected onto the texture.
Buttons on the Edit pane
- X Rot/Y Rot/Z Rot
- You can rotate the object.
- Light Button
- You can change the light position.
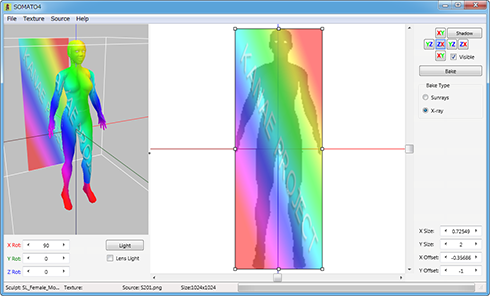
Bake Type
- Sunrays
- The source texture is projected only on one side.
- X Ray
- The source texture is projected on the whole surface.
Shade Value
- Ambient
- The strength of the ambient light is determined.
- Diffuse
- The strength of the diffuse light is determined.
- Specular
- The strength of the specular light is determined.
- Sp. Exp
- The range of the specular light is determined.
- Shading
- The model of shading is determined. You can select it from Flat / Gouraud / Phong / Sumi.
- Sumi
You can get shadow texture like dirt on the shadow layer. In Japanese, it is called "Sumi-ire".
When you select Sumi and you click the bake shadow button, the dialog are shown.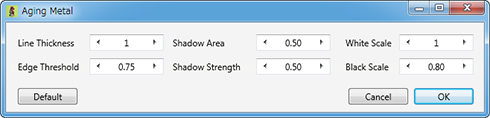
- Line Thickness
- The thickness of the ridgeline of the boundary of the face and the face is assigned by pixel.
- Edge Threshold
- The degree of the conditions of judging the face is assigned.
- Shadow Area
- The rate of the zone which draws the dirt shadow is assigned.
- Shadow Strength
- The strength of the dirt shadow is assigned.
- White Scale
- The level of the white color of the convex ridgeline is assigned.
- Black Scale
- The level of the black color of the concave ridgeline is assigned.
- Lighting
- The model of lighting is determined. You can select it from Lambert / Phong-Blinn / Oren-Nayar / Cook-Torrance.
- Shadow
- You can set the value of the self shadow. 0%: No self shadow. 100%: Black self shadow.
- AO Rate
- You can set the value of the ambient occlusion. 0%: No ambient occlusion. 100%: Black ambient occlusion.
- AO Rad
- You can set the sampling radius of the ambient occlusion.
1%: Minimum radius. It is subject to the influence of the narrow zone.
100%: Maximum radius. It is subject to the influence of the large zone. - AO Num
- You can set the number of the samplings of the ambient occlusion.
1%: Minimum samplings. It brings rough texture.
100%: Maximum samplings. It brings smooth texture.
X Size / Y Size / X Offset / Y Offset
The range of the source image is specified.
- Move edit pane
- If you press the space key and drag the mouse, the view point of the edit pane is moved.
- Zoom edit pane
- If you press CTRL+"+" or CTRL+"-" key, the edit pane is zoomed.
- Move
- If you press an arrow key, the selected control point is moved 1 pixel.
If you press an arrow key and the Shift key simultaneously, it will move 8 pixels.
1. How to project your image onto a sculpted prim
- 1) Select File>>Open Object from the menu and you can load a sculpted prim.
- The sculpted prim which you loaded is displayed in the preview pane.

* You can also drop your sculpt map file into the preview pane.
- 2) Select Texture>>Size from the menu and you can select the size of texture which will be made by SOMATO.
-
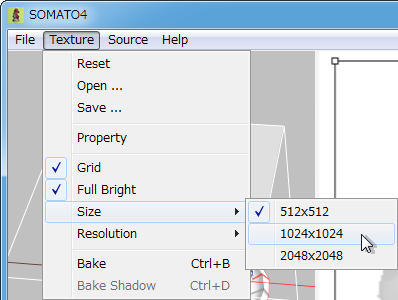
* You can select Texture>>Resolution from the menu and you can select Sunrays resolution.
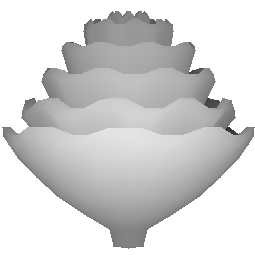
- 3) Choose the direction to project with the XYZ projection buttons.
-
You can choose from the six directions of the XYZ axis the direction which projects the image on a sculpted prim.
Dark colors indicate a longer distance and the background is displayed brightly. - 4) Select Source>>Save from the menu and you can save this image.
*This step can be skipped if you have the image traced to make a sculpted prim.
saved image- 5) Create the image which fits a sculpted prim exactly using the image which had been saved.
-

You can change the size of the image.
You can change the aspect ratio of the image. - 6) Select the Source>>Open from the menu and you can load the image to project.
- The size of the picture projected is adjusted automatically. The loaded picture is displayed on right-hand side.
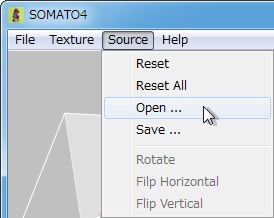

This is the image you wish to base your new prim texture on.* You can dorp the image file to project into edit pane.
- 7) Select Bake Type. Then click the Bake button.
-
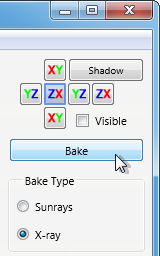 Sunrays projects an image only the place where light hits.
X-ray projects an image also on the back side.
The image is projected on your sculpted prim. You can check the results in the preview pane.You made the following texture.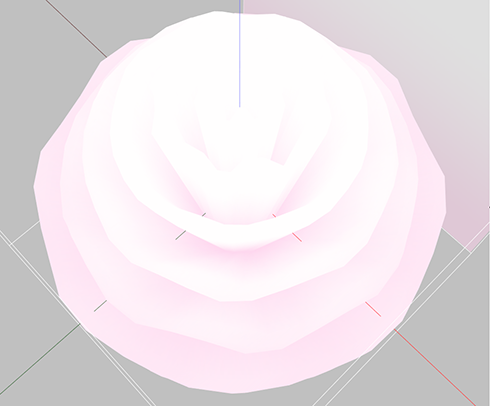
- 8) Select Texture>>Save from the menu and you can save new projected texture.
-
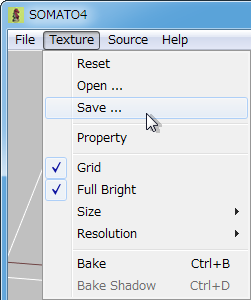

saved texture
12/14/24
-The operating environment has been changed to Windows 10/11.
01/16/20
-The operating environment has been changed to Windows 8.1/10.
11/03/14 SOMATO 4.72
-The loading obj file was updated.
-The loading collada file was updated.
10/27/14 SOMATO 4.71
-The type of shading "SUMI" was added. In Japanese, it is called "Sumi-ire".
-The loading obj file was updated.
-The loading collada file was updated.
Thank you Maruru Mayo for giving the idea of SUMI.
03/17/14 SOMATO 4.59
-The popup menu on the edit pane was added.
-The thread of the making texture was updated.
-The bug of the property of texture was fixed.
-The bug of selection layer option to open the texture was fixed.
-The layer name of PSD fie was changed.
-The grid on Texture menu was updated.
02/23/14 SOMATO 4.58
-The rendering engine was updated.
-The property of texture was added.
-The ambient ccclusion was added.
-The value option was added to the self shadow.
-MacOSX was supported.
09/09/11 SOMATO 3.0.39
06/12/10 SOMATO 2.5.24
09/17/08 SOMATO 1.0.7A
09/07/08 SOMATO 1.0.7
-First release
A trial period is for three days. In a trial period, you cannot output textures.
When starting software, a dialog box asking for a serial code (license) is displayed.
After the trial period has passed, it becomes impossible to start.
Please purchase SOMATO Serial Code (license) from the SOMATO Serial Box in-world at: KANAE PROJECT Shop
- ImageEn
- by HiComponents 1998-2011
Thanks to KJ Georgette for help with this Readme file.
This article is automatically translated by the computer interpreter.
Please notify me of any mistakes in translation.