|
NOMI (Chisel) -Sculpted Prim Relief Maker- by Yuzuru Jewell (KANAE PROJECT) produced by youwith 06/12/10
NOMI Frequently Asked Question(FAQ)
NOMI 4.0 Preview for mesh
NOMI 3.0.28 for win32 download Virus checked by NOD32 ver.5183
A trial period is for three days. In a trial period, you can't output Sculpted Prims or Texture Files.
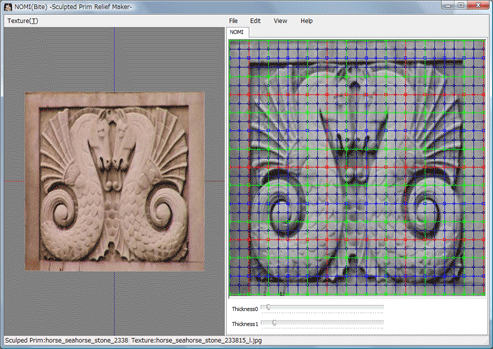
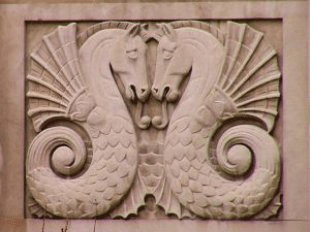
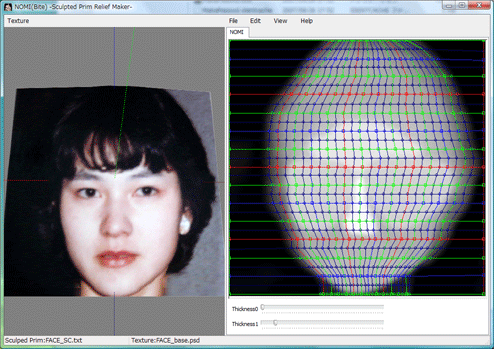
NOMI is the software which simply makes sculpted prim with a relief surface from one picture using the brightness of it. A preview can be checked before uploading to SL. Relief refers to variations in elevation similar to topographical maps.
From the original picture, the software outputs a sculpted prim picture and a texture picture.
Moreover, better relief can be achieved if the desired height information is added and processed.
A user moves a control point, can smooth the surface of relief or can make the relief which is not a square. And a user can draw the brightness of height data.
NOMI means chisel in Japanese.
NOMI 3.0.27 users can use their password.
NOMI 1.08-2.21 users need to purchase an updated license from the serial box in SL at:http://slurl.com/secondlife/Phasic%20Foo/32/13/23
The Software is provided "AS IS," without a warranty of any kind.
In no case shall the author be liable for any damage or unwanted behavior of any computer hardware and/or software.
No Rental. Customer may not rent or lease the SOFTWARE to someone else.
All title and copyrights in and to the SOFTWARE (including but not limited to all images, photographs, animations, video, audio, music, text, and other information incorporated into the SOFTWARE), the accompanying printed materials, and any copies of the SOFTWARE, are owned by KANAE PROJECT. The SOFTWARE is protected by copyright laws and international treaty provisions. Accordingly, Customer is required to treat the SOFTWARE like any other copyrighted material, except as otherwise allowed pursuant to this LICENSE and that it may make one copy of the SOFTWARE solely for backup or archive purposes.
Operating environment
Windows XP/Vista/7 - The environment where the "Second Life for Windows" operates.
Install
There is no installer.
Uninstall
You can uninstall only by deleting the file called NOMI.exe.
How to use Preview
You can drag an object and can make it rotate.
You can scale the object using the mouse wheel.
A red point is the control point chosen.
X,Y,Z sliders: When you set X,Y,Z sliders on multiple prims, the data is reflected in the text outputted for TSUBO.
The Tabs in NOMI:
TSUCHI
In the TSUCHI tab, the elevations are changed by adjusting the control points.
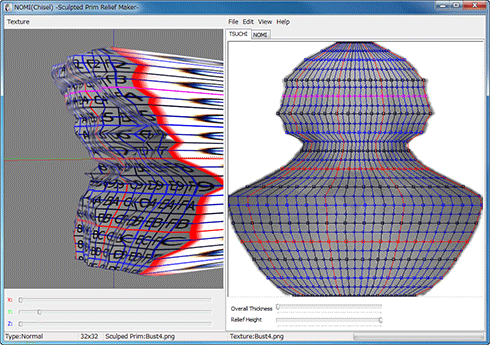
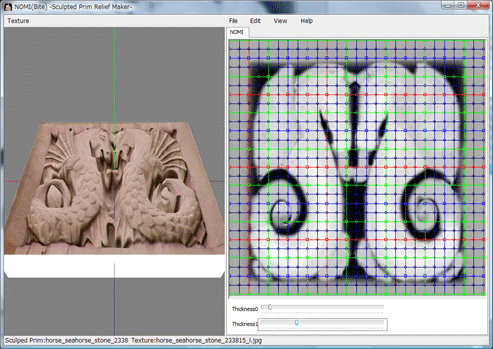
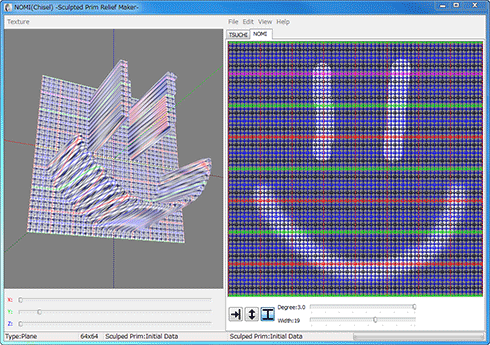
NOMI
In the NOMI tab, the elevations are changed by drawing on the map with a pen.
The following functions are available by clicking the right button of the mouse which displays a popup menu.
Absolute Height: You can draw absolute height.
Relative height: You can adjust the present height.
Gaussian Blur: You can obscure/soften height.
Height Pick:You can set the height of the specified position as the height of Absolute Height.
Height/Degree:You can specify the level of the attribute of a pen.
Width:You can specify the width of a pen.
How to use the Menu:
Texture
-Reset
It returns to the status when starting.
-Load
Texture is loaded. Software resizes the file to 512x512.
The usable file types are JPEG/PNG/BMP/PSD.
-Save
A texture is saved in the size 512x512 PNG format.
-Divided Save
While you are editing two or more sculpted prims, a texture is divided and saved for every sculpted prim from the texture file.
File
-New Project
It returns to the status when starting.
You can choose it from three types.
Normal: The conventional Relief
Plane: Relief of plane
Plane with border: Relief which attached the edge by plane
Half Sphere: The sphere in which the control point of the same number has been arranged at the front and the back.
Half Cylinder: The cylinder in which the control point of the same number has been arranged at the front and the back.
You can choose the aspect ratio of a sculpted prim from the 28 types.
-Reset Points
Only Control point returns to the status when starting.
-Load Base Picture
Software reads the picture used as relief. The usable file types are TGA/JPEG/PNG/BMP/PSD.
-Load Sculpted Prim
Sculpted Prim Texture is loaded from a file made previously. The file types which can be read are .tga .png .bmp and NOMI Template Files (.obj or .txt)
*The size of Sculpted Prim must be either of 64x64, 128x128, 256x256, and 512x512.
-Save Sculpted Prim
A sculpted prim bitmap (.tga or .png), .obj file, and NOMI export(.txt) file is specified and outputted.
*An output sculpted prim bitmap's size is either of 64x64 and 128x128. Any .obj files can use Wings3D.
-Setup
You can set up the TGA size of file to save. 64x64 is the recommended size.
You can set up the control point size.
Texture updated manually - You can escape delay by automatic updating.
Copy Protection by transparent - When a prim is modifiable, you can make the sculpt map transparent to prevent the texture from being copied by screen capture.
Auto Rename - When saving a file, you can change the name of a file automatically so that it may not be overwritten.
-Exit
The program is closed.
Edit
When you choose more than one control point, the following functions are available by clicking the right button of the mouse which displays a popup menu. When you don't select any control points, this popup menu is not enabled.
-UNDO/REDO (not on right click popup menu)
There is a 256-step UNDO and REDO function available.
-Equal Columns
The selected control points are rearranged at equal intervals for every line.
-Equal Intervals
The interval of three or more selected control points is evenly arranged.
-Flip Height Data
The software will reverse the height data.
-Rotate Object
You can use it by Half Sphere and Half Cylinder. You can replace back a relief front.
View
-Zoom
You can expand the editing screen. You can change magnification by using the wheel of the mouse also.
-Grid
You can add a grid. The control points will snap to the grid.
-Level of Detail
The level of detail is displayed in three steps.
-Load Height Data
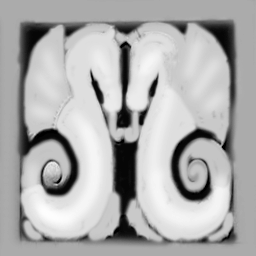
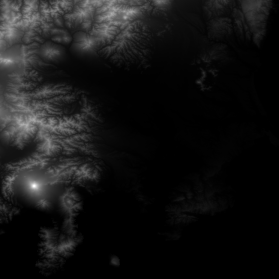
Software reads height data. Software changes the read picture into the gray scale of 256x256. The background of the display becomes the data on height. Black is low and white is high. And you can load Terrain File of secondlife(*.RAW).
-Save Height Data
Height data are saved in a .tga/.png file of the gray scale of 256x256.
Keyboard Operation
-Move
If you push an arrow key, the selected control point is moved 1 pixel. If you press the arrow key and the Shift key simultaneously, it will move 8 pixels. If you are using the grid display, the points snap to the grid and the Shift/arrow key combination cannot be used.
TUTORIAL
1. Making a NOMI relief map.
Preparation:
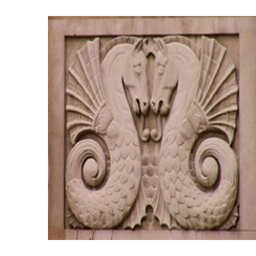
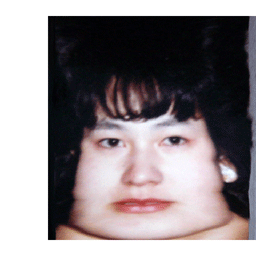
One picture: Prepare the picture so there is no excess white space around the image.
Procedure:
1) A user boots NOMI.
2) A user makes a picture to use as relief with Menu-File-Load Base Picture.
A Photoshop file, and JPEG and a PNG file can be used. It resizes automatically.
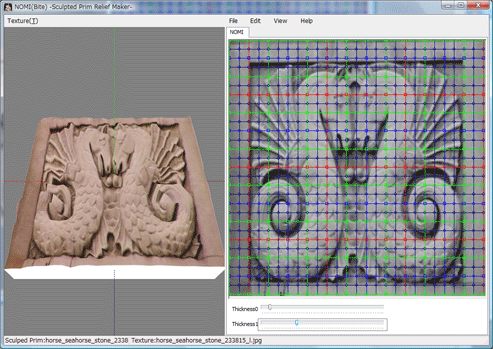
3) Height is automatically decided by the brightness of the picture.
Height is reversed by Flip-Height Data.
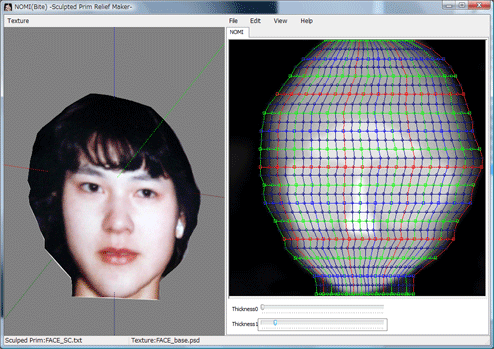
Height and the thickness of relief are adjusted with the two trackbars at the bottom.
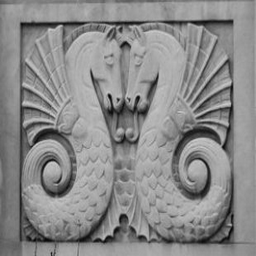
4) A texture is outputted by Texture-Save.
A picture is outputted as a TGA file of 512x512. Because the original picture is not taking the solid structure of relief into consideration, be sure to save a texture.
Because a side and the back side become white, it is good to re-process it by Photoshop or GIMP.
5) A sculpted prim is outputted by File-Save Sculpted Prim.
Texture |
Sculpted Prim |
If white area of texture is not wanted, it can be filled in any graphics program.
6) A user uploads the picture of the outputted texture and sculpt map to SL.
7) A user applies the uploaded texture to an object.
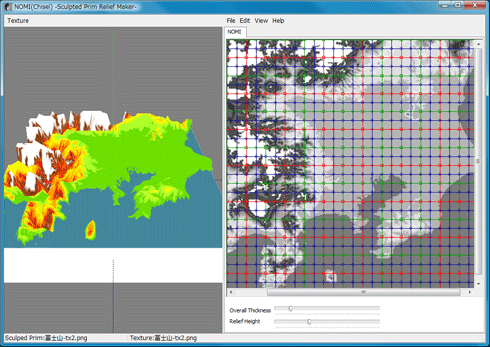
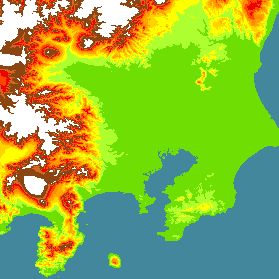
2. The solidified map
Preparation
You can transrate to BMP file from it using BIL2BMP.
The picture which saved the height data on a map by gray scale (the same size as a map picture) Black is low and white is high.
Procedure:
1) A user boots NOMI.
2) With File-Load Base Picture Software reads a map picture.
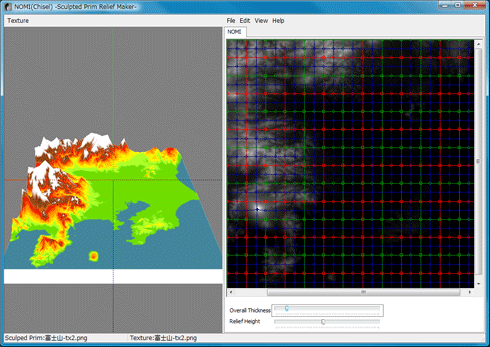
3) With View-Load Height Data, Software reads the picture which saved the height data on a map.
4) Height and the thickness of relief are adjusted with the two trackbars at the bottom.
5) A texture is outputted by Texture-Save.
6) A sculpted prim is outputted by File-Save Sculpted Prim.
7) A user uploads the picture of the outputted texture and sculpt map to SL.
8) A user applies the uploaded texture to an object.
3. Customizing Height data
Preparation:
One picture
Procedure:
1) A user boots NOMI.
2) A user makes a picture to use as relief with Menu-File-Load Base Picture.
A Photoshop file, and JPEG and a PNG file can be used. It resizes automatically.
3) Height is automatically decided by brightness of a picture.
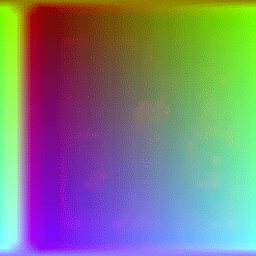
4) The picture of height data is outputted by View-Save Height Data.
5) By Photoshop or GIMP, a user adjusts the height data on a picture.
6) The picture of height data is outputted by View-Load Height Data.
A user repeats 5) and 6) and adjusts height.
7) A texture is outputted by Texture-Save.
8) A sculpted prim is outputted by File-Save Sculpted Prim.
9) A user uploads the picture of the outputted texture and scalp to SL.
10) A user applies the uploaded texture to an object.
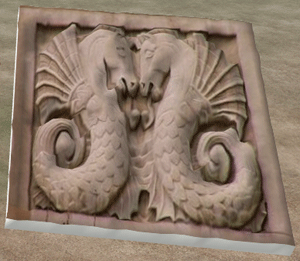
SL Image |
4. Adjusting a mesh

prepered picture |
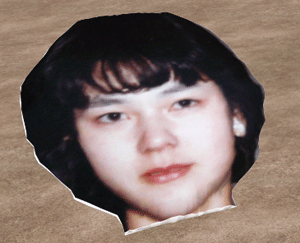
The smoother surface can be made if the position of a control point is changed. Because a texture also changes automatically according to the mesh which changed, be sure to save a texture picture not only a sculpt picture but after moving a control point.
Modified Texture |
5. Changing a side.
The form of relief can be transformed if the control point of a right-and-left end is moved. However, because the height of control of an upper end and a lower end is fixed, it is necessary to make a picture in consideration of this structure.
SL Image |
Tutorial Video
You can see Tutorial Video from http://www.youtube.com/user/YuzuruJewell
History
06/12/10 3.0.28
-The library of OpenGL was updated. It avoids the bug of ATI Catalyst 10.5.
03/08/10 3.0.27
-You can output 28 kinds of multiple Prim which consists of 8-256x8-256.
-Divided Save was added on the Texture menu. The function to divide and save multiple prim textures.
-The function to read a texture automatically by reading of an OBJ file was added.
-The mechanism of update the texture was changed.
-The reading function of Terrain File (*. RAW) was added.
-Arrangement of the default control point was optimized.
-Equal Intervals and Rotate Object were added on right click popup menu.
-256x4 Item was deleted on New Project dialog.
-"Color Picker" was renamed to "Height Pick".
05/03/09 2.0.21
-Two projects were added.
If it is rotated, I can edit a table and the reverse side.
-The project can use the aspect rate which can be edited.
-The tab was added to the edit pane.
An old edit pane is called TSUCHI and a new tab is called NOMI. You can edit height with a NOMI tab. You draw height relative to absolute height, use gaussian blur, or can do the pickup of height.
-The function which I rename when there is the same file name was added.
-The function to memorize a preservation reading file name for every kind of file was added.
05/29/08 1.11
-The display language of the internal error was changed into English.
-The description of an output of an OBJ file was changed.
-The Load of OBJ file is corresponded to a new OBJ file. You can also load the OBJ file outputted before.
-The preview pane became more exact.
04/13/08 1.10
-PRIM_SCULPT_TYPE_PLANE was Supported. Two project type was added.
-Function of copy protection by transparent was added.
-A BMP file can be Loaded as a sculpted prim.
11/28/07 1.08 First release
-"Save Height Data" can use PNG form.
11/24/07 1.07 RC
-"Overall Thickness" and "Relief Height" replaced the position.
-The function, Save/Load a sculpted prim in PNG form, was added.
-"Reset All" of menu was changed into "New Project".
-The "Reset Points" function was added.
Only Control point returns to the status when starting.
11/05/07 1.06
-"View Level" Menu was changed to "Level of Detail".
-Sculpted Prim Texture Size Option was changed to 64x64 and 128x128. Since the "use lossless compression" option of 128x128 or less picture was added to viewer of the second life, this option was changed. I recommend using this option.
10/26/07 1.05
-The setup was added to the menu. The size of a control point can be changed.
10/23/07 1.04
third beta release
-The color of the mesh was united with three steps of resolutions of sculpted prim.
Red:Low Red,Green:Middle Red,Greeen,Blue:High
-"Initializing" of the Texture menu was changed into "Reset".
-"Initializing" of the File menu was changed into "Reset All".
-"Reset All" was changed into the specification which also resets a texture.
-The "Thickness0" label was changed into "Overall Thickness".
-The "Thickness1" label was changed into "Relief Height".
-Texture-Save The default preservation format of the menu was changed into PNG from TGA. PNG doesn't support an alpha channel.
10/18/07 1.03
second beta release
09/30/07 1.02
first beta release
Trial & Buy
A trial period is for three days. In a trial period, you cannot output Sculpted Prims.
When starting software, a dialog box asking for a serial code (license) is displayed.
After the trial period has passed, it becomes impossible to start.
Please purchase NOMI 3.0 Serial Code (license) from the NOMI Serial Box in-world at: http://slurl.com/secondlife/Phasic%20Foo/32/13/23
Credits
-GLScene http://glscene.sourceforge.net/wikka/HomePage
GLScene is released to the public as open-source under Mozilla Public Licence. http://www.mozilla.org/MPL/
-Graphics32 http://www.graphics32.org
Graphics32 is released to the public as open-source under Mozilla Public Licence. http://www.mozilla.org/MPL/
-ImageEn by HiComponents 1998-2010
Thanks to KJ Georgette for help with this Readme file.
KANAE PROJECT All rights reserved.
|